
Written by: Paul Foster, Founder, CEO, OnePlan
Key Takeaways
- A community market toilet placement plan is a to-scale, permit-ready site document that maps every portable restroom unit, ADA-accessible fixture, handwashing station, and service route across the market footprint.
- Core placement principles include distributing units in clusters of 5–10 so no attendee walks more than 3–4 minutes, ensuring at least 5% of units are ADA-compliant with accessible routes, and maintaining 100-foot buffers from food-preparation areas.
- Capacity planning starts at 1 portable toilet per 100 attendees for daytime markets up to 6 hours, increasing to 1 per 75 for longer events, with 20–30% added for hot weather and 15–20% for family-heavy crowds.
- Successful plans require mapping food-vendor exclusion zones, watercourses, accessible parking, and service-vehicle access routes before placing any units on the site plan.
- OnePlan streamlines the entire workflow from site assessment to permit-ready exports, and you can book a demo to see how it can transform your next community market layout.
Core Principles for Community-Market Toilet Placement
Four core principles guide every placement decision before you position a single unit on the map.
Location and flow. No attendee should walk more than 3–4 minutes to reach a restroom. Distribute units in clusters of 5–10 across the market instead of concentrating them in one corner. Position clusters just off main vendor aisles so they stay visible without blocking pedestrian or vendor traffic. Use OnePlan’s arrival and exit calculators at calculators.oneplan.io/arrival and calculators.oneplan.io/exit/calculator to model peak-hour flow before you commit to cluster locations.
ADA accessibility. Under ADA Title III, at least 5% of total portable restroom units at public events must be ADA-compliant, with a minimum of one unit regardless of event size. Each ADA unit needs an accessible route with a firm, slip-resistant surface, a maximum running slope of 1:20, and clear approach space in front of the door. Place at least one ADA unit within each cluster instead of grouping all accessible units in a single location. Make sure wheelchair users can reach these units easily from accessible parking. Requirements vary by state and locality, so confirm details with your local health department and fire marshal.
Capacity. For a daytime market lasting up to 6 hours without alcohol service, plan for 1 portable toilet per 100 attendees. For events over 6 hours, increase that ratio to 1 per 75 attendees. Increase counts for hot weather by 20–30%, and for family-heavy crowds by 15–20%.
Separation from food. Regulations vary by jurisdiction; examples require portable toilets at least 50 ft from food-preparation areas and 100 ft from water supplies (Ohio) or 50 m from watercourses (Victoria, Australia). Because requirements differ, a practical planning target is to maintain 100 feet from food-vendor areas, which satisfies most jurisdictions and provides a comfortable odor buffer. Beyond distance, orient units to face away from food stalls and position them downwind based on prevailing wind direction.
Signage. A common ADA violation at temporary events is the absence of visible signage indicating the location of accessible restrooms. Post directional signs at every major aisle intersection and at market entry points. Include distance estimates and universal pictograms so visitors can find facilities quickly.
Success indicator: You can draw a straight line from any vendor stall to the nearest restroom cluster on your site plan and confirm the walking distance is under 3–4 minutes, the food-vendor buffer is met, and at least one ADA unit appears in every cluster.
With these core principles in place, the next sections walk through a seven-step process that turns them into a permit-ready site plan.
Step 1: Define Market Restroom Objectives
Step 1: Define Objectives
Objective: Set the non-negotiable outcomes your toilet placement plan must achieve before you position any unit.
Inputs needed:
- Expected peak attendance and event duration
- Whether alcohol or food service is provided
- Local health-department and fire-marshal requirements for your jurisdiction
- The ADA minimums described earlier (confirm with your local authority, as state requirements may exceed federal minimums)
- Permit application deadlines and required documentation format
Decisions to make:
- Total unit count and ADA unit count, based on attendance and ADA ratios
- Number of handwashing stations, using 1 station per 4–6 standard units and 1 per 3 units near food service areas
- Number of restroom clusters and their approximate zones across the market footprint
Trade-offs: Fewer, larger clusters reduce rental cost but increase walking distances and queue risk. More clusters improve attendee experience but require more service-truck access points on your plan.
Success indicator: You have a written unit count, ADA count, handwashing count, and cluster count confirmed against your local health department’s guidelines before you open the site plan.
Step 2: Assess the Market Site
Step 2: Assess the Site
Open the site in OnePlan on a live satellite or street map. Use the area and perimeter calculator to outline the full market footprint and each vendor zone. Then mark the following on the map:
- Food-vendor rows and food-preparation areas, which define your exclusion buffers
- Watercourses, drainage channels, or stormwater infrastructure
- Prevailing wind direction so you can position units downwind of food areas
- Ground surface type, since soft grass, mud, or gravel violates ADA compliance and requires stabilized panels or portable flooring
- Existing accessible parking locations, because ADA units must connect to these via an accessible route
- Service-vehicle access routes, ensuring service trucks can drive within 25 feet of every unit without crossing pedestrian walkways
Success indicator: Every food-vendor area, watercourse, accessible parking bay, and service route is marked on your OnePlan map before you place a single toilet object.
Step 3: Map Infrastructure on Your Plan
Step 3: Map Infrastructure
With your site assessment complete, start placing toilet objects on the OnePlan map. Use the drag-and-drop library to position standard portable restroom units, ADA-accessible units, and handwashing stations to scale. Every object stays geo-accurate as you zoom, so food-vendor buffers and ADA travel distances stay measurable directly on the map using the area and perimeter calculator.

Key placement rules to enforce on the map, in order of priority:
First, set your non-negotiable buffers. Maintain adequate distance from any food-preparation area and from any watercourse, because these are regulatory requirements.
Next, position ADA units at the end of each cluster, never in the middle, so wheelchair users can approach from the side. Mark a clear approach zone in front of every ADA unit.
Finally, refine for service and visitor comfort. Orient all units to face away from food-vendor aisles, and draw service-vehicle access paths from the nearest road to within 25 feet of each cluster.
Success indicator: Every unit on the map has a measurable buffer from food areas and watercourses, every ADA unit has a drawn accessible route connecting it to accessible parking, and every cluster has a drawn service-vehicle path.
Step 4: Plan Movement and Access Around Toilets
Step 4: Plan Movement and Access
Place units just off main walkways so they remain visible without blocking traffic flow. Keep access paths wide enough for lines to form without obstructing emergency routes.
In OnePlan, use points of interest to mark pedestrian entry and exit points, then draw pedestrian flow paths from each cluster back to the main vendor aisles. Check that:
- Queue space in front of each cluster does not spill into a primary walkway or emergency access lane
- Accessible routes to ADA units meet required standards
- Signage points are marked at every major aisle intersection leading to a cluster
- Lighting points are marked for any cluster that will be in use after dusk
Use OnePlan’s arrival and exit calculators to estimate peak-hour pedestrian demand at each cluster location. Adjust cluster sizes if a single zone will absorb a disproportionate share of traffic.
Success indicator: Pedestrian flow paths, queue zones, accessible routes, signage points, and lighting points are all drawn on the map and do not intersect with emergency access lanes or food-vendor aisles.

Common Market Toilet Layout Mistakes to Avoid
The same errors appear repeatedly in permit reviews and on-site inspections. Each one has a direct fix in your site plan.
Mistake 1: All units in one location. Concentrating all restroom units in a single location creates unnecessary congestion, limits accessibility for large portions of the crowd, and generates complaints even when the total unit count is sufficient. Distributing units in clusters of 5–10 across the market reduces walking distances, spreads queues across the site, and keeps each vendor zone served by a nearby cluster.
Mistake 2: ADA units isolated or on uneven ground. Accessible units are frequently positioned incorrectly on slopes, behind barricades, or in mud. Place ADA units on firm, level surfaces with a drawn accessible route to accessible parking.
Mistake 3: Units too close to food vendors. Placing units too close to food-preparation areas violates health codes and creates odor complaints. Draw an appropriate exclusion buffer around every food-vendor area on your map before you place any toilet object.
Mistake 4: No service-vehicle access path on the plan. Inspectors and servicing contractors need to see that trucks can reach every unit. Draw service routes on the map and confirm they do not cross pedestrian walkways.
Mistake 5: Missing or unclear signage locations. As noted in the Core Principles section, missing signage for accessible restrooms is a frequent ADA violation. Mark signage points at every aisle intersection and market entry on the plan.
Mistake 6: Underestimating hot-weather demand. Hot weather requires a 20–30% increase in toilet units above the baseline ratio. Build the weather adjustment into your unit count at Step 1 and document it in your permit submission.
Success indicator: A peer review of your site plan finds no cluster too close to a food-vendor area, no ADA unit on uneven ground, and signage points at every major approach path.
Book a 15-minute demo to see OnePlan in action and build your first permit-ready market layout.
Step 5: Coordinate Stakeholders
Step 5: Coordinate Stakeholders
After you complete the layout, share the live OnePlan map with every stakeholder who needs to review it, including your local health department, fire marshal, parks department, and sanitation contractor. Real-time collaboration keeps every reviewer working from the same current plan instead of a static PDF that may already be out of date.
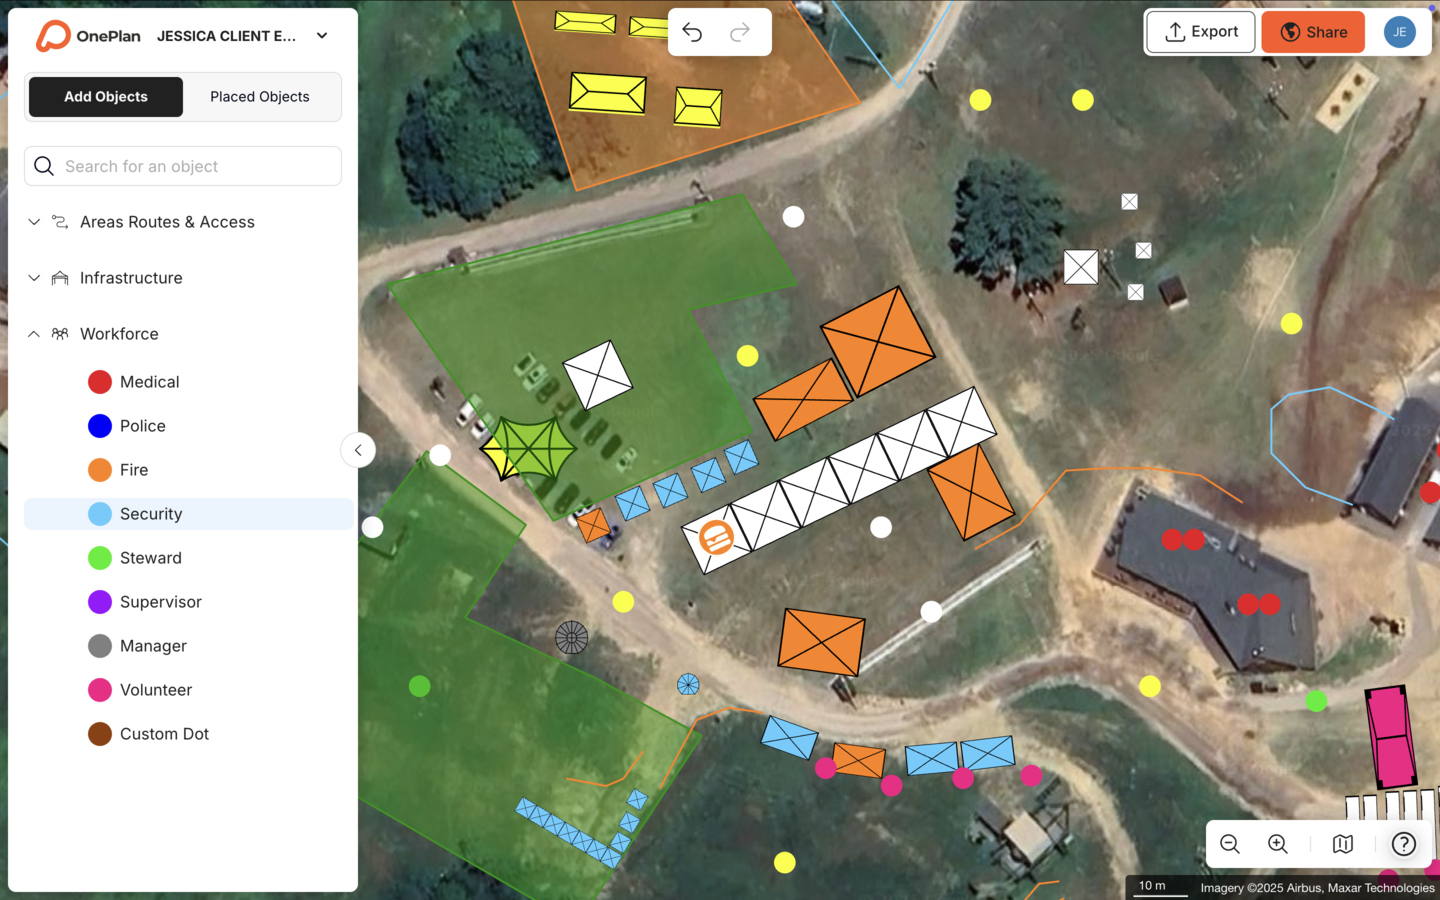
Use comments and version history in OnePlan to capture requested changes, document decisions, and show how you addressed each concern. This shared record reduces confusion during inspections and follow-up reviews.
Success indicator: All stakeholders review a single live map, and requested changes are documented directly in OnePlan rather than scattered across email threads.
Step 6: Prepare Permit Documentation
Step 6: Prepare Documentation
Prepare the following documentation from your OnePlan layout for permit submission:
- A high-resolution site map, exportable up to A0 and print-ready, showing all unit locations, ADA routes, food-vendor buffers, and service-vehicle paths
- A Bill of Quantities export listing every toilet unit, ADA unit, handwashing station, and signage point with counts and specifications
- A written servicing plan specifying pump-out frequency, with at least twice-daily servicing by day two for multi-day events and more frequent servicing in high-density zones or hot weather
- An ADA accessibility plan showing accessible unit locations and route dimensions
Confirm submission deadlines with your local authority. Temporary event permit applications typically require a site map, servicing plan, ADA accessibility plan, and emergency response plan for sanitation failures, with applications started well in advance of the event. Verify the documentation format required by your local authority, as noted in the Core Principles section.
Success indicator: Your permit package includes a to-scale site map, a Bill of Quantities, a servicing schedule, and an ADA accessibility plan, all derived from a single OnePlan export.
Step 7: Export Your Permit-Ready Plan
Step 7: Live-Map Workflow and Export
OnePlan’s browser-based canvas turns the steps above into a single, shareable, to-scale document. Use this export workflow to create your permit-ready plan:
- Open your market site in OnePlan on a live satellite or street map.
- Outline the market footprint and vendor zones using the area calculator, as described in Step 2.
- Drag and drop portable restroom, ADA restroom, and handwashing station objects from the library onto the map. Every object is to scale and stays accurate as you zoom.
- Use the measurement tool to verify food-vendor buffers and ADA travel distances directly on the map.
- Draw accessible routes, service-vehicle paths, pedestrian flow paths, and queue zones using OnePlan’s line and path tools.
- Place points of interest for signage locations, lighting points, and market entry and exit points.
- Export a high-resolution PNG site map, up to A0 and print-ready, for your permit application.
- Export the auto-generated Bill of Quantities to Excel or CSV for your sanitation contractor and procurement team.
The Bill of Quantities automatically tallies every object placed on the map, so your permit package and contractor order sheet stay in sync with the plan.
Success indicator: Your exported site map and Bill of Quantities match exactly, with every unit, ADA fixture, handwashing station, and signage point accounted for and ready for health-department review.
Capacity Planning Table for Community Markets
The table below provides planning ratios for community markets using portable restrooms. All figures are starting points, and requirements vary by state and locality. Always confirm with your local health department and fire marshal before you finalize unit counts.
| Event Type | Standard Units (per attendees) | ADA Units (minimum) | Handwashing Stations |
|---|---|---|---|
| Daytime market, up to 6 hrs, no alcohol | 1 per 100 attendees | 5% of total units (min. 1) | 1 per 4–6 standard units; 1 per 3 near food |
| Market over 6 hrs, no alcohol | 1 per 75 attendees | 5% of total units (min. 1) | 1 per 4–6 standard units; 1 per 3 near food |
| Market with alcohol service | 1 per 50–75 attendees | 5% of total units (min. 1) | 1 per 3–4 standard units near food |
| Hot weather adjustment (any type) | Add 20–30% to baseline count | Scale proportionally | Scale proportionally |
Bill of Quantities example (500-attendee, 6-hour daytime market, no alcohol, hot weather):
| Item | Base Count | Hot-Weather Adjustment (+25%) | Final Order Quantity |
|---|---|---|---|
| Standard portable restroom units | 5 (1 per 100 attendees) | +1–2 units | 6–7 units |
| ADA-accessible restroom units | 1 (5% minimum, min. 1) | — | 1 unit |
| Handwashing stations (general) | 1–2 (1 per 4–6 units) | — | 1–2 stations |
| Handwashing stations (near food vendors) | 1 per 3 units near food | — | 2–3 stations |
These figures are illustrative. Confirm all quantities with your local health department and sanitation contractor before you place orders.
Frequently Asked Questions
How far in advance should I submit a toilet placement plan for a community market permit?
Local authorities require permit applications in advance of the event, with lead times that vary by jurisdiction. Start your site plan as early as possible so you have time to incorporate health-department feedback without rushing. OnePlan lets you build and revise a to-scale layout quickly, so late-stage changes from a reviewer do not require starting over.
What happens if my toilet placement plan fails inspection?
A failed inspection typically means the event cannot open until corrections are made, which can involve relocating units, adding accessible routes, or increasing unit counts on the day. The most common reasons for failure are ADA units on uneven ground, insufficient separation from food-vendor areas, missing accessible routes, and no signage plan. Building your plan to scale in OnePlan and sharing it with your health department before the event day helps you catch these issues at the review stage instead of on the morning of the market.
Do toilet placement requirements differ between states?
Yes, they differ significantly. Federal ADA Title III sets the national floor for accessible unit ratios and route requirements, and state and local health codes add further rules. These rules cover minimum unit counts, separation distances from food vendors, surface requirements, servicing frequency, and permit documentation formats. California, for example, enforces ADA-compliant portable toilet requirements under both state and federal law. As emphasized throughout this guide, always confirm jurisdiction-specific requirements with your local health department and fire marshal before you finalize your plan.
How do I calculate how many toilet clusters I need across a large market site?
The core rule is that no attendee should walk more than 3–4 minutes to reach a restroom. On a large site, map your vendor zones in OnePlan, then use the area and perimeter calculator to measure walking distances from the furthest point in each zone to the nearest proposed cluster location. If any zone exceeds the 3–4 minute threshold, add a cluster. Use OnePlan’s arrival and exit calculators to estimate peak-hour pedestrian demand and check that no single cluster is absorbing a disproportionate share of traffic.
What documentation does a permit-ready toilet placement plan need to include?
Most health departments require a to-scale site map showing all unit locations, ADA unit locations, accessible routes, food-vendor separation buffers, and service-vehicle access paths. Many also require a written servicing schedule, an ADA accessibility plan, and a unit inventory. OnePlan exports a high-resolution site map and an auto-generated Bill of Quantities that covers the inventory requirement, giving you a complete permit package from a single platform. Always verify the exact documentation format required by your local authority.
Conclusion
A community market toilet placement plan is not a formality. It is the document that determines whether your event opens on time, passes inspection, and serves every attendee safely. Vague guidelines and disconnected spreadsheets often produce plans that fail review. A repeatable, to-scale workflow that maps food-vendor buffers, ADA routes, service-vehicle paths, and cluster locations in one live plan produces a permit-ready layout the first time.
OnePlan has powered more than 200,000 events in 150 countries, from local community markets to the Olympics, and its drag-and-drop, map-based platform is built for this kind of work. The Eagle Mountain City case study shows how one municipality cut event planning from 8–10 hours to a few hours per event and achieved a 5x return on investment after switching to OnePlan for its community event layouts.