
Written by: Paul Foster, Founder, CEO, OnePlan
Key Takeaways for Parade Vendor Layouts
- Strong parade vendor placement balances sales potential with safety rules and permitting requirements.
- Place high-revenue vendors at corners, keep aisles between 10 and 15 ft, and maintain a 6 ft setback from the parade path.
- Separate food and retail zones, use U-shaped or loop layouts, and use vertical merchandising to increase sales.
- Reserve clear emergency-vehicle access lanes and mark them on a to-scale map to satisfy fire, police, and permitting authorities.
- OnePlan provides to-scale mapping and collaboration tools so you can build compliant layouts quickly. Book a 15-minute demo to see it in action.
Seven Rules for Parade Vendor Booth Placement
Rule 1: Place Top Vendors at Corners and Intersections
Put your highest-revenue vendors at street corners and route intersections. These include food trucks, headline sponsors, and popular retail brands. Corner positions with two open sides draw more foot traffic than inline spots with only one open side. Attendees approach from several directions, so these locations behave like prime retail real estate. Reserve them for vendors who can handle volume and whose signage pulls people out of the main flow.
Rule 2: Keep Vendor Aisles Between 10 and 15 Feet Wide
Every aisle between facing vendor rows needs a clear width of at least 10 ft at low-density street festivals. Use 15 ft where crowd volumes are high or where the route also functions as an emergency-vehicle corridor. Many cities require clear emergency access roads within event sites, which reflects a wider rule. Aisle widths must support both pedestrian movement and emergency response. Narrow aisles create bottlenecks and slow evacuation. They also cause permit applications to be rejected. Measure every aisle on your plan before you submit it.
Rule 3: Keep Vendors 6 Feet Back from the Parade Path
Vendor positions must never intrude into the active parade lane. A minimum 6 ft setback from the parade path protects spectators and vendors from floats and marching units. This clearance also preserves sightlines for crowd-control staff who monitor the parade lane. Beyond these operational needs, the setback helps satisfy the street-closure conditions many municipalities attach to parade permits. Many permitting guides require site plans to show fire and emergency access lanes alongside all vendor and vehicle positions. That requirement only works when the parade lane itself stays clearly marked and unobstructed on the map. Mark the setback zone as a no-placement buffer on your layout before you assign vendor spots.
PARADE LANE (clear zone, no vendors) |<--- 6 ft setback --->| [ VENDOR ][ VENDOR ][ VENDOR ] <-- vendor row, parade side |<------- 10–15 ft aisle ------->| [ VENDOR ][ VENDOR ][ VENDOR ] <-- vendor row, spectator side |<--- 6 ft setback --->| SPECTATOR ZONE
Basic parade vendor spacing diagram. Build this layout to scale in minutes. Book a 15-minute demo to see OnePlan in action.

Rule 4: Separate Food Vendors from Retail Vendors
Food and retail vendors need different infrastructure, permits, and crowd management. Mixing them often creates food queues that spill into retail browsing areas. Cities usually require vendor details and locations to appear clearly on site maps. Food vendors also face extra health department rules. Cluster food vendors in a dedicated zone with extra aisle width to absorb queue depth. Place retail vendors in a separate zone where browsing traffic moves more slowly and steadily.
Rule 5: Use U-Shaped or Loop Layouts to Avoid Dead Ends
Dead-end vendor rows trap attendees and cause reverse-flow congestion. A U-shaped or loop configuration keeps foot traffic moving past every vendor without forcing people to backtrack. Effective food-hall design gives every vendor similar visibility by guiding guests past every option. The same principle applies to street festival vendor layouts. On a parade route, a U-shape works well at a plaza or park terminus. Vendors line both arms of the U, and the open base faces the incoming crowd. A full loop suits longer linear routes where the street grid allows a clear return path.
Rule 6: Use Vertical Merchandising Inside Each Vendor Space
Vendor placement controls how many people walk past. Vertical merchandising influences how many people stop and buy. A practical three-zone model places brand signage and hero imagery above 60 inches, featured and high-margin products in the 30–60 inch zone, and bulk or heavy items below 30 inches. Front displays should stay under 135 cm to preserve open sightlines for pedestrian safety and event staff visibility. Taller fixtures belong deeper inside the vendor footprint, not at the front edge where they block crowd-control sightlines. Include maximum display-height guidance in your vendor briefing pack so every vendor complies without case-by-case negotiation on event day.
Rule 7: Mark Dedicated Emergency-Vehicle Access Lanes
Every vendor layout needs at least one unobstructed emergency-vehicle access lane that runs the full length of the vendor zone. This requirement sits on top of the aisle widths described in Rule 2. Many cities require fixed-location vendors to position vehicles so they do not block intersections, sidewalks, or fire hydrants. They also enforce minimum distances from hydrants and intersections. Mark the emergency lane on your submitted map with a distinct color or label. Confirm it with your fire marshal before you finalize vendor assignments. Make sure no vendor places signage, generators, or equipment inside this lane. Requirements vary by jurisdiction, so confirm the specific clearance width with your local fire and police contacts.
See how OnePlan’s emergency-lane tools work in a free demo
Mapping Your Parade Layout to Scale
The seven rules only work when your map enforces them accurately. A screenshot dropped into presentation software will not keep true measurements when you zoom. A hand-drawn sketch rarely satisfies a fire marshal who must verify aisle widths and emergency-lane clearances. You need a single, to-scale plan that every stakeholder can trust. That includes operations, police, fire, public works, and vendors.
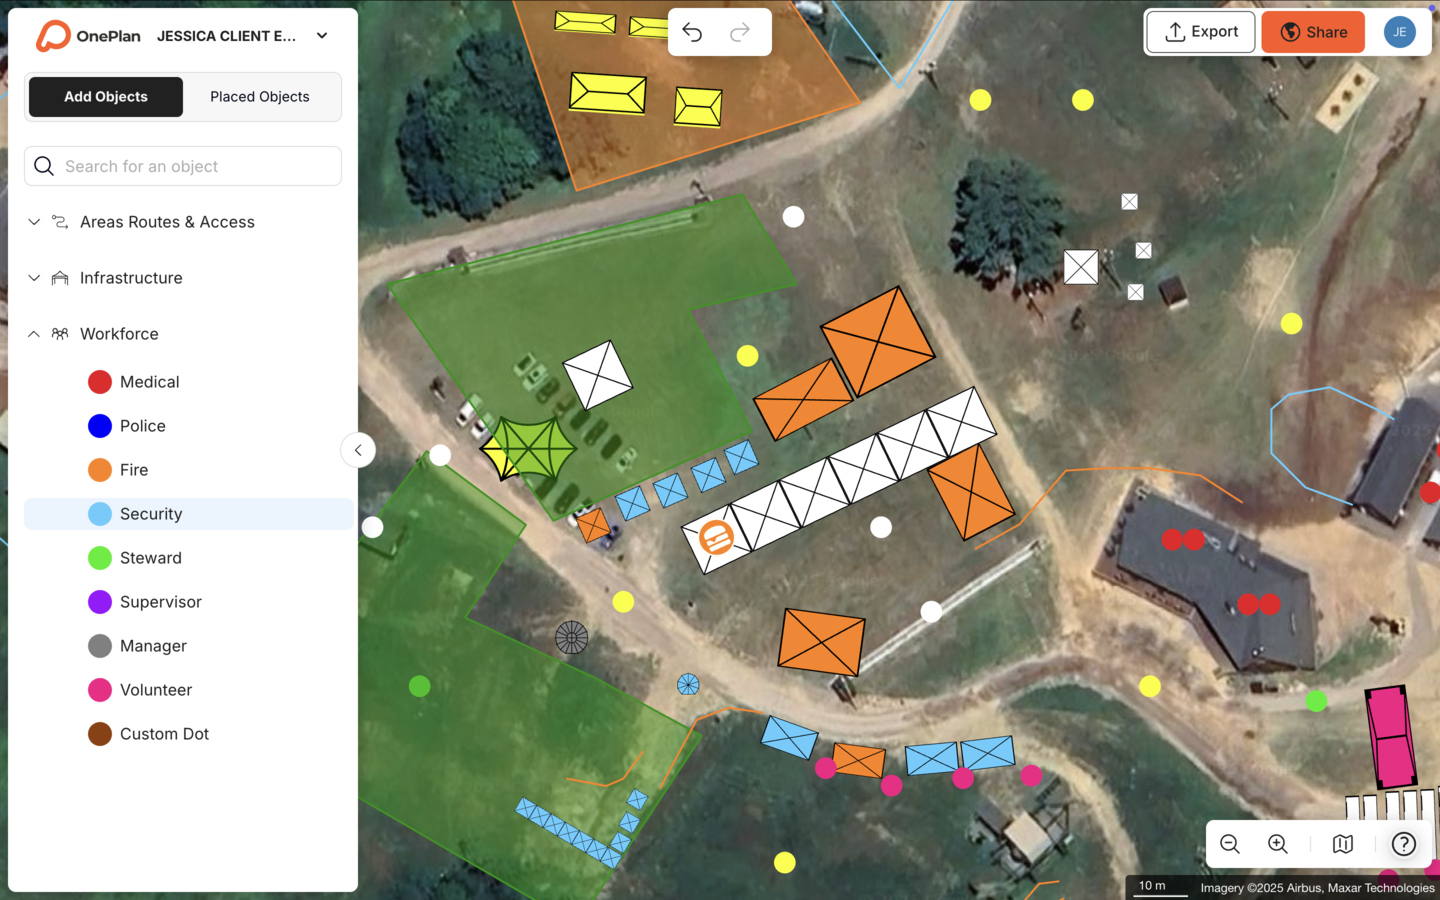
OnePlan uses a live satellite or street map as the base layer. Every vendor, aisle marker, setback buffer, and emergency-access lane you place on it stays to scale as you zoom. Eagle Mountain City cut event planning from 8–10 hours to a few hours per event by replacing separate department maps with one shared OnePlan layout. The North Texas Tribute Jam’s organizer reported that sharing detailed plans for roadblocks, crowd control, and traffic management led to fast, low-stress health and safety approvals.

After you place vendor positions, OnePlan’s crowd-capacity and arrival and exit calculators help you confirm that aisle widths and zone sizes can handle expected attendance. You can do this before you commit to the layout. The auto-generated Bill of Quantities converts everything on the map into an exportable inventory list. That list covers vendors, barriers, signage, and generators. Attach it directly to your permit application. One plan, one export, one submission.
Start your first event free and test these layout tools yourself
Frequently Asked Questions
How far in advance should I finalize my parade vendor booth layout for permitting?
Many cities require a site plan as part of the special event permit application, with deadlines that vary by jurisdiction. Work backward from your local deadline and aim to have a draft layout ready at least three weeks before submission. That buffer gives you time to add feedback from fire, police, and public works before the final version is due. Requirements differ by region, so confirm your specific timeline with your local permitting office.
Which stakeholders need to sign off on a vendor layout before the event?
Your fire marshal and police department usually review the layout for emergency access and crowd-control compliance. Depending on your city, public works, the health department, and a parks authority may also need to approve it. Food vendors often need separate health permits in addition to the overall event permit. Confirm the full list of approving bodies with your local special events office early in the process. Once you have stakeholder buy-in, you will rely on accurate site data to refine and share your layout.
Where do I get accurate site data for my parade route map?
Start with your city’s GIS portal or public works department for street widths, curb lines, and utility locations. OnePlan’s base layer uses current satellite and street map imagery, which is often more up to date than a council’s own GIS files. You can also import existing site plans or drone images as .png files. Scale them onto the map as a base layer and build your layout on top.
Can I update the vendor layout after the permit has been submitted?
Most jurisdictions allow amendments, but they may require resubmission and re-approval, which takes time. Reduce late changes by sharing your layout with fire and police contacts informally before formal submission. OnePlan’s real-time collaborative plan means any update appears instantly for everyone working in the same plan. That visibility removes version confusion when changes are necessary.
What safety issues most often cause vendor layouts to fail inspection?
Inspectors most often flag insufficient aisle widths, blocked emergency-vehicle access lanes, and food vendors placed too close to open flames or animals. They also reject booths that encroach on the parade path or obstruct fire hydrants and intersections. Marking setback buffers and emergency lanes clearly on your to-scale map, instead of estimating them by eye, gives you the best chance to catch these problems early. Always verify specific requirements with your local fire marshal and permitting authority.
Does this seven-rule framework work for both small and large parades?
Yes. The rules scale proportionally. A smaller parade with 20 vendors still needs separated food and retail zones, clear emergency access, and compliant aisle widths. The same measurements apply to a smaller footprint. OnePlan supports events of every size, from a community block party to events with hundreds of vendors. Your first event is free, so you can test the layout at any scale before you choose a paid plan.
Conclusion: Turn Seven Rules into One Shared Plan
Compliant, high-performing parade vendor booth placement rests on seven repeatable rules. Place prime vendors at corners, keep aisles between 10 and 15 ft, and set booths back 6 ft from the parade path. Separate food and retail, use loop or U-shaped layouts, apply vertical merchandising within each booth, and protect emergency-vehicle access lanes. OnePlan turns those rules into one exportable, to-scale map that your team and every approving authority can work from together. Build your compliant vendor layout in minutes, start free today